Chocolate mousse pie! It’s that luscious dessert that can transform a mundane dinner into something extraordinary. Whether it’s a birthday celebration, holiday gathering, or just a casual weeknight treat, this pie finds a way to elevate the moment. Most importantly, it’s straightforward to prepare, even for those who might not consider themselves great chefs.
Before we dive headfirst into this delectable recipe, let’s take a moment to consider what you might want to enjoy alongside this chocolate mousse pie. Pairing options include:
- Fresh Berries: Strawberries, raspberries, or blueberries make for a vibrant contrast in both color and flavor.
- Whipped Cream: A dollop of freshly whipped cream takes the pie to another level of creaminess.
- Espresso or Coffee: Enjoying a small cup alongside your dessert complements the rich flavors beautifully.
- Vanilla Ice Cream: This classic pairing never disappoints, adding a cold, creamy texture to the meal.

What is Easy Chocolate Mousse Pie?
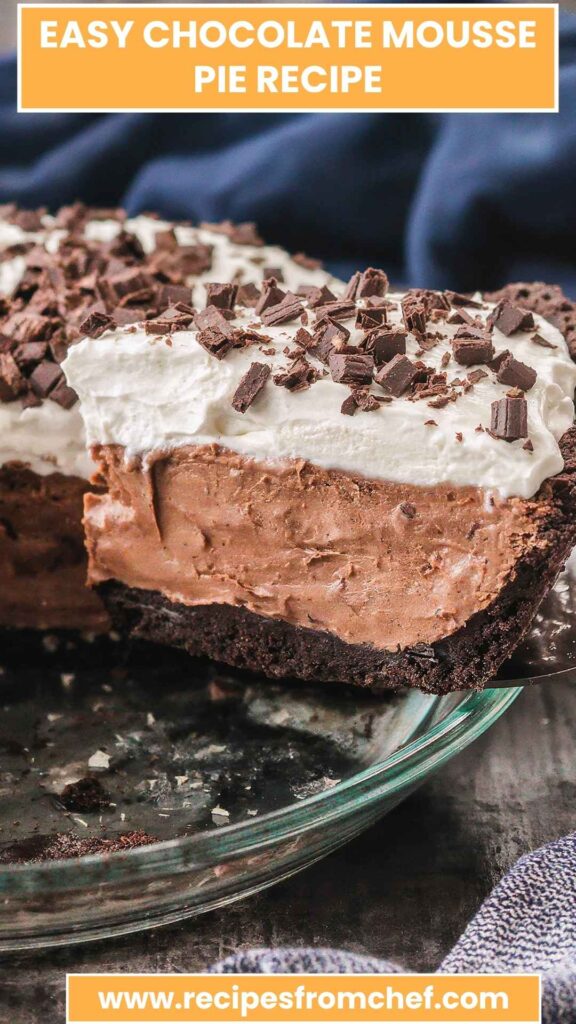
Easy chocolate mousse pie is a delightful dessert combining rich chocolate flavor with a creamy, airy mousse texture, all nestled in a ready-made Oreo cookie crust.
Essentially, it’s a culinary hug on a plate—a dessert that not only pleases your taste buds but is also incredibly simple to whip up. You won’t need to channel your inner pastry chef for this one.
What Does It Taste Like?
The first bite reveals a burst of chocolate richness. The sweetness of the mousse, paired with the slight bitterness from the dark chocolate, creates a well-rounded flavor. The creaminess of the filling contrasts beautifully with the crunchy Oreo crust, making for an indulgent yet balanced dessert.
Adding a sprinkle of orange zest on top enhances the experience with a hint of citrus that elevates the chocolate taste.
Why This Recipe Works
This recipe has several compelling reasons why it’s a must-make:
1. Simplicity: The recipe uses readily available ingredients and straightforward techniques. Anyone can confidently pull this off.
2. Flavor Balance: Combining bittersweet and semi-sweet chocolate strikes the perfect equilibrium. You get plenty of rich chocolate flavor without feeling overwhelmed by sweetness.
3. Texture Heaven: The interplay of the silky mousse against the crumbly crust satisfies every texture lover’s dream. It’s smooth, crunchy, and utterly satisfying.
4. No-Bake Convenience: With minimal effort and no oven required, this dessert can be your go-to during warmer months or when you just don’t want to heat up the kitchen.
Ingredients for Easy Chocolate Mousse Pie
Before we get into the nitty-gritty of preparation, gather your ingredients:
- 1 teaspoon pure vanilla extract
- 2 cups (104g) miniature marshmallows
- 1 pre-made Oreo cookie pie crust (6 oz)
- 1/3 cup (80ml) whole or 2% milk
- 1/2 cup (3 oz) bittersweet chocolate morsels (or opt for another half cup of semi-sweet if you prefer less richness)
- 2 tablespoons (25g) granulated sugar
- 2 tablespoons (28g) salted butter, cut into 4 chunks
- 1 teaspoon instant espresso powder
- 1 cup (6 oz) semi-sweet chocolate morsels
- 1 cup (235ml) heavy whipping cream
- Zest of 1 orange
- 1 3/4 cups (415ml) heavy cream, chilled
- Chocolate curls or shavings, for garnish

Step-by-Step Instructions
Let’s get down to the fun part—creating this masterpiece!
Step 1: Prepare the Chocolate Mixture
In a medium saucepan, combine the bittersweet morsels, milk, and chunks of salted butter. Heat the mixture over low heat, stirring constantly until smooth and melted. Once you have a glossy chocolate mixture, remove it from the heat.
Step 2: Add Espresso and Marshmallows
Stir in the instant espresso powder and miniature marshmallows to your chocolate mixture while it’s still warm. Keep stirring until the marshmallows dissolve, giving the chocolate an extra creamy texture and a hint of coffee flavor.
Step 3: Whip the Cream
In a large mixing bowl, pour in 1 cup of heavy whipping cream and the vanilla extract. Using an electric mixer, whisk until soft peaks form. This means the cream will hold its shape but still be soft enough to fold into the chocolate later on.
Step 4: Combine Chocolate and Cream
When your chocolate mixture is cool (but not hardened), gently fold in the whipped cream. Be careful not to deflate the whipped cream too much; you want that light, airy texture.
Step 5: Assemble the Pie
Once thoroughly mixed, pour the chocolate mousse into the pre-made Oreo cookie crust. Smooth the top with a spatula. Then, cover it lightly and chill it in the refrigerator for at least 4 hours, or preferably overnight. This allows the mousse to set beautifully.
Step 6: Garnish
Before serving, whip the remaining heavy cream and add a touch of sugar if desired. Spread or pipe this whipped cream on top of the chilled mousse pie. Finish with a sprinkle of orange zest and chocolate curls for that extra pizazz!
Notes
- Use Quality Chocolate: The flavor is only as good as the chocolate you choose. Opt for a quality bittersweet chocolate for the best results.
- Chill Everything: Make sure your cream and any mixing bowls are chilled. This keeps the cream from warming up and losing its volume when whipped.
- Adjust Sweetness: If you prefer a less sweet dessert, you can reduce the sugar slightly in the recipe.
- Garnish Creatively: Feel free to get creative! Use fresh mint leaves, berries, or even edible flowers as garnishes.
- Accessibility: Ensure your ingredients are at hand before starting to avoid any interruptions.
Nutrition Information
A typical slice of this chocolate mousse pie contains:
- Calories: 320
- Total Fat: 22g
- Saturated Fat: 12g
- Carbohydrates: 30g
- Sugars: 20g
- Protein: 4g
Exact nutrition information may vary based on ingredient brands and measuring methods.
How to Store the Leftovers?
For any leftovers—which might be a stretch considering how delicious this pie is—store them in the refrigerator. Cover the pie with plastic wrap or transfer slices to airtight containers. Properly stored, it will last up to 3 days while still retaining its flavor and texture.
Sides for Easy Chocolate Mousse Pie
If you want to balance out the richness of the chocolate mousse, consider serving it with these delightful sides:
1. Fresh Fruit Salad: A mix of berries, melons, and citrus fruits creates a refreshing contrast that cuts through the creamy dessert.
2. Coffee or Tea: A cup of freshly brewed coffee or herbal tea provides a nice warmth, complementing the chilled mousse pie perfectly.
3. Ice Cream Sandwiches: Creating ice cream sandwiches with your favorite cookies can add a playful element to dessert time.
4. Savory Appetizers: Serving light appetizers like bruschetta or cucumber sandwiches before indulging helps balance the sweetness later on.
Alternative Choices for Ingredients
If you find yourself missing an ingredient, don’t panic! Here are some easy substitutions:
1. Milk: If you’re out of whole or 2% milk, almond or coconut milk works well. It will slightly alter the flavor but still yield a scrumptious pie.
2. Heavy Whipping Cream: Greek yogurt can be whipped into a lighter option. Though the texture will be different, it adds a nice tang.
3. Semi-sweet Chocolate Morsels: Feel free to use milk chocolate or even white chocolate if you prefer a sweeter flavor profile.
4. Oreo Crust: If you don’t have access to an Oreo crust, try a graham cracker crust or a homemade cookie crust using any of your favorite cookies.

Conclusion
In conclusion, this easy chocolate mousse pie is your ticket to a delightful dessert experience. With its rich flavors, airy textures, and simple preparation, it’s bound to impress family and friends alike. It’s also flexible, allowing for substitutions and pairings that make it your own.
So, grab those ingredients, roll up your sleeves, and get ready to whisk your way to a delicious treat. After all, life is too short for mediocre desserts. Happy baking!
You’ll also like the following recipes!

Easy Chocolate Mousse Pie Recipe – Recipes From Chef
Description
Chocolate mousse pie! It’s that luscious dessert that can transform a mundane dinner into something extraordinary. Whether it’s a birthday celebration, holiday gathering, or just a casual weeknight treat, this pie finds a way to elevate the moment. Most importantly, it’s straightforward to prepare, even for those who might not consider themselves great chefs.
Ingredients
Instructions
Step 1: Prepare the Chocolate Mixture
-
In a medium saucepan, combine the bittersweet morsels, milk, and chunks of salted butter. Heat the mixture over low heat, stirring constantly until smooth and melted. Once you have a glossy chocolate mixture, remove it from the heat.
Step 2: Add Espresso and Marshmallows
-
Stir in the instant espresso powder and miniature marshmallows to your chocolate mixture while it's still warm. Keep stirring until the marshmallows dissolve, giving the chocolate an extra creamy texture and a hint of coffee flavor.
Step 3: Whip the Cream
-
In a large mixing bowl, pour in 1 cup of heavy whipping cream and the vanilla extract. Using an electric mixer, whisk until soft peaks form. This means the cream will hold its shape but still be soft enough to fold into the chocolate later on.
Step 4: Combine Chocolate and Cream
-
When your chocolate mixture is cool (but not hardened), gently fold in the whipped cream. Be careful not to deflate the whipped cream too much; you want that light, airy texture.
Step 5: Assemble the Pie
-
Once thoroughly mixed, pour the chocolate mousse into the pre-made Oreo cookie crust. Smooth the top with a spatula. Then, cover it lightly and chill it in the refrigerator for at least 4 hours, or preferably overnight. This allows the mousse to set beautifully.
Step 6: Garnish
-
Before serving, whip the remaining heavy cream and add a touch of sugar if desired. Spread or pipe this whipped cream on top of the chilled mousse pie. Finish with a sprinkle of orange zest and chocolate curls for that extra pizazz!
Nutrition Facts
Servings 10
- Amount Per Serving
- Calories 320kcal
- % Daily Value *
- Total Fat 22g34%
- Saturated Fat 12g60%
- Total Carbohydrate 30g10%
- Sugars 20g
- Protein 4g8%
* Percent Daily Values are based on a 2,000 calorie diet. Your daily value may be higher or lower depending on your calorie needs.
Note
- Use Quality Chocolate: The flavor is only as good as the chocolate you choose. Opt for a quality bittersweet chocolate for the best results.
- Chill Everything: Make sure your cream and any mixing bowls are chilled. This keeps the cream from warming up and losing its volume when whipped.
- Adjust Sweetness: If you prefer a less sweet dessert, you can reduce the sugar slightly in the recipe.
- Garnish Creatively: Feel free to get creative! Use fresh mint leaves, berries, or even edible flowers as garnishes.
- Accessibility: Ensure your ingredients are at hand before starting to avoid any interruptions.