20 Minute Bread Recipe
This post contains affiliate links. As an Amazon Associate I earn from qualifying purchases.
Getting kids to eat fresh, homemade bread feels impossible—until you try this approach. Most families assume artisan loaves require hours of waiting and complex techniques. But I’ve spent years translating professional baking methods into something achievable on a weeknight, and this twenty-minute bread recipe proves you don’t need a sourdough starter or special equipment to create something restaurant-quality.
When my own family gathers around warm, crusty loaves fresh from the oven, I see the same magic my grandmother created in her Pittsburgh kitchen. Let me share how you can bring that same experience to your table, even on your busiest days. If your family enjoys experimenting with flavors, you might also love exploring sides like Balsamic Asparagus Recipe to complement your fresh bread.
20 Minute Bread Recipe the Whole Family Will Actually Eat (Picky Eaters Included)
I’ll never forget the afternoon my ten-year-old nephew arrived at my kitchen declaring he “didn’t like bread” because store-bought slices felt bland and mushy to him. Within thirty minutes of mixing this dough, kneading it with his own hands, and watching the oven work its magic, he’d eaten two slices with nothing but a light smear of butter. The transformation wasn’t magical—it was sensory.
He’d participated in creating something real, watched the yeast do its work, and tasted the difference between genuine fermentation and commercial processing. That’s when I realized: picky eaters don’t reject food; they reject disconnection. This recipe bridges that gap beautifully.
Why Kids Love This Version
There’s something about fresh bread that speaks to children differently than store-bought alternatives. The crust crackles when you break it, the interior steams with warmth, and the aroma fills your entire home with promise. But beyond sensory appeal, this recipe works for picky eaters because it removes the intimidation factor—no fancy proofing baskets, no overnight waiting, no complex language about gluten development.
- Immediate gratification – Most bread recipes demand patience measured in hours. This one delivers results in under an hour from start to finish, which keeps young attention spans engaged and eliminates the “are we done yet?” frustration.
- Hands-on participation – Children who help mix, punch down, and shape dough feel genuine ownership over the final product. That investment translates directly into willingness to eat what they’ve created.
- Perfect texture for all ages – The crust is sturdy enough for little fingers to grip without falling apart, and the interior is tender without being mushy or dense. Toddlers can manage it; teenagers will request seconds.
- Customizable toppings and uses – Plain warm bread is wonderful, but this base accepts everything from simple butter to garlic, herbs, everything bagel seasoning, or even cinnamon-sugar for a breakfast twist.
How to Get Kids Involved in Making This
The beauty of this recipe lies in its flexibility for different developmental stages. Every family member, from your preschooler to your teenager, has meaningful work to do. This isn’t busy-work disguised as cooking—these are genuine contributions that teach real skills.
- Ages 3-5: The Whiskers and Watchers – Little ones can help pour pre-measured dry ingredients into a large bowl while you supervise. They love the sensory experience of running their hands through flour (keep a damp washcloth nearby for easy cleanup). Once water is added by an adult, they can watch and narrate the transformation: “The flour is getting wet! It’s becoming dough!” This builds early understanding of how ingredients work together without safety risks.
- Ages 6-9: The Mixers and Punch-Downers – School-age children can take the lead on stirring the dough mixture with a sturdy spoon, though you’ll need to provide hand-over-hand guidance since the dough becomes quite thick. During the second rise, they become the official “punch-down specialists”—using two forks to gently deflate the dough. Let them feel the transformation from an airy, risen mass back to something more compact. This teaches cause-and-effect and gives them real responsibility.
- Ages 10+: The Bakers – Older children can handle nearly every step independently with your supervision. They can measure ingredients (teaching them about precision and fractions), manage the timer, monitor oven temperature, and eventually turn the baked loaves onto cooling racks. This is where they develop genuine baking intuition—learning to recognize when dough has risen properly, understanding heat management, and building confidence in the kitchen.
The Ingredients – Hidden Nutrition, Visible Deliciousness
This bread recipe works because it strips back to essentials—no hidden vegetables, no complicated substitutions. What you see is what you get, which appeals to cautious eaters who need transparency. That said, the simplicity itself is nutritionally smart. Whole grains could replace half the all-purpose flour for fiber and B vitamins, and the fermentation process created by the yeast actually makes the minerals in flour more bioavailable to your body. Your kids are getting real nutrition with zero pretense.
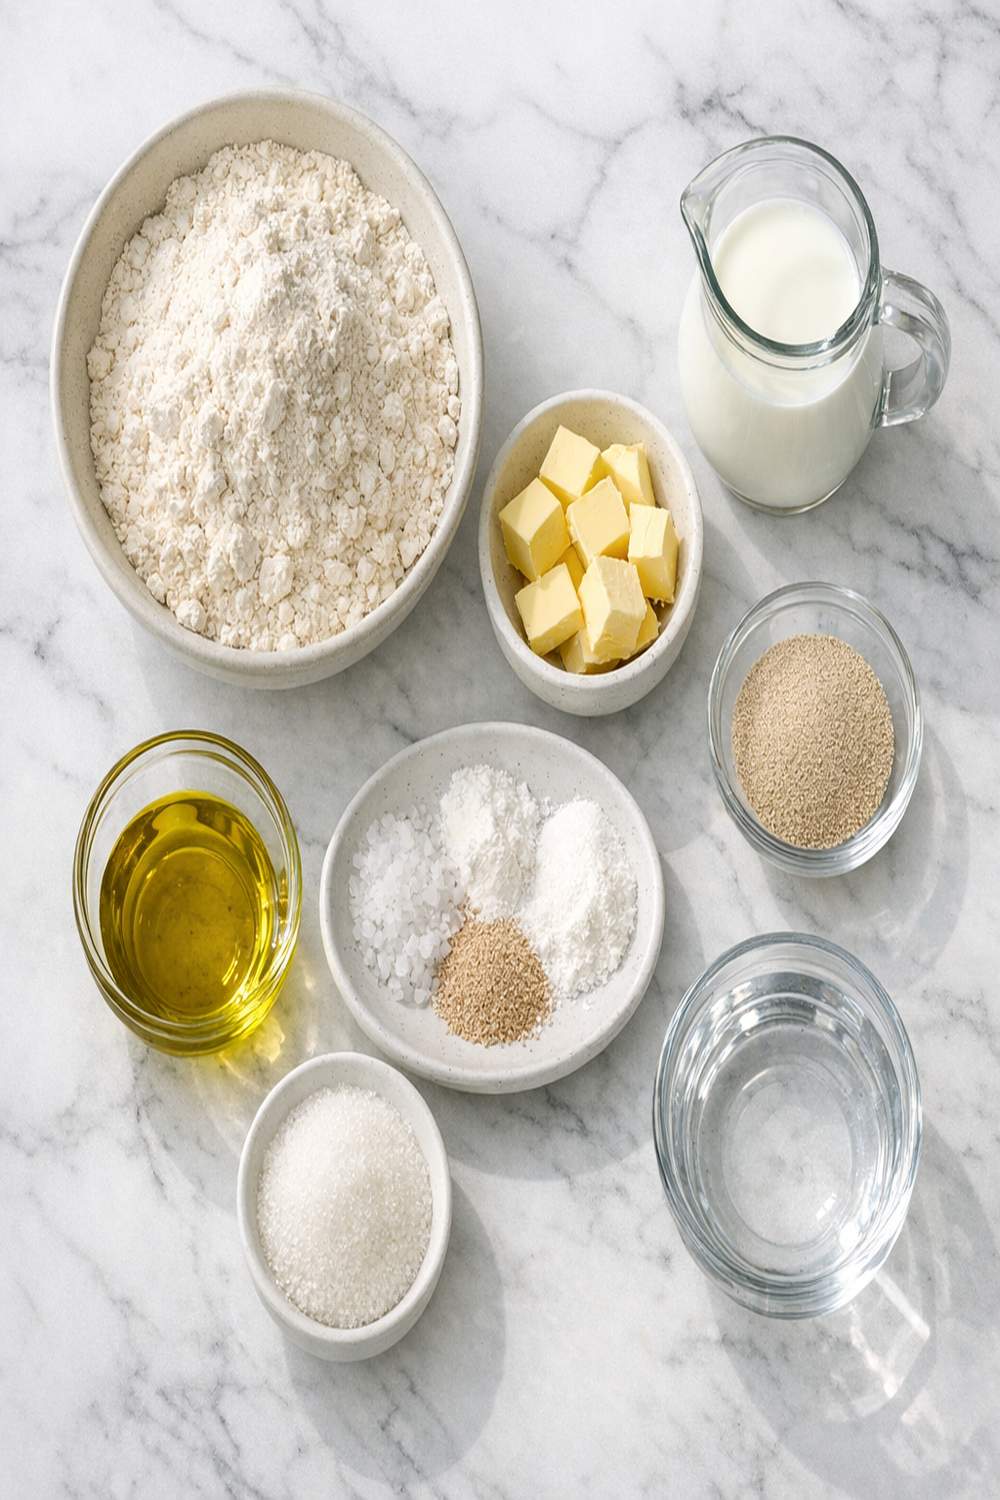
- 2 cups lukewarm water (achieve this by mixing 1.5 cups cold water with 0.5 cup boiling water, allowing yeast to activate properly)
- 1 tablespoon honey (optional but recommended for subtle sweetness and improved browning)
- 4 cups all-purpose or bread flour (spooned and leveled, never packed, providing structure and protein for growth)
- 2 teaspoons sugar (feeds the yeast and aids browning)
- 1 teaspoon olive oil (alternative topping for a Mediterranean twist)
- 2 teaspoons instant yeast (the live culture that creates rise and develops complex flavor through fermentation)
- 2 teaspoons kosher salt (enhances flavor and controls fermentation pace)
- 2 tablespoons room temperature butter (for greasing bowls and creates optional topping)
Makes: 2 beautiful loaves, approximately 8 slices each
How to Make 20 Minute Bread Recipe for the Whole Family
This isn’t just cooking—it’s a family event. Set aside forty minutes and approach this as quality time together, not a chore to rush through. Play music, assign roles, and let conversation happen naturally. Some of my favorite memories with my own family involve the rhythm of bread-making: the sound of a spoon against a bowl, the smell of yeast awakening, the anticipation of something warm and real emerging from the oven.
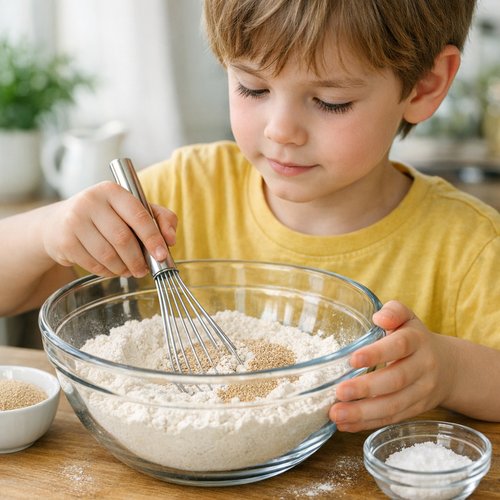
Step 1: Combine Your Dry Foundation
In a large mixing bowl, whisk together your flour, salt, sugar, and instant yeast until well combined. This dry mixture is the foundation of everything that follows. Whisking distributes the yeast evenly, which ensures consistent rising throughout your dough. Assign a school-age child to handle the whisking—they’ll need about two minutes of vigorous stirring. The mixture should look fairly uniform, with no visible clumps of yeast or salt.
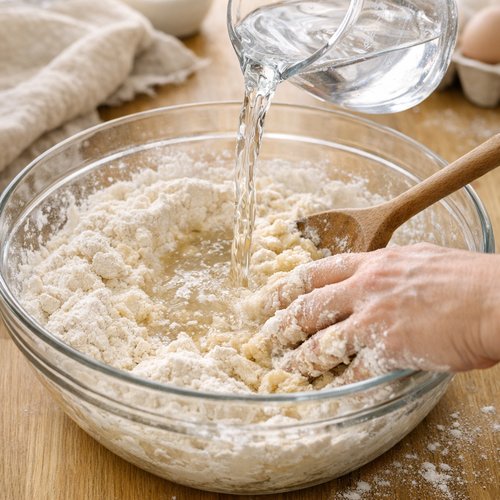
Step 2: Introduce the Water and Unite
Pour your lukewarm water into the dry mixture. The temperature matters here—water that’s too hot will kill the yeast, while water that’s too cold won’t activate it properly. You want it to feel comfortably warm, like bathwater. Stir everything together using a sturdy wooden spoon or your hands until the flour is completely absorbed. Don’t worry about smoothness at this stage; you’re simply ensuring no dry flour remains. The dough will look shaggy and rough, almost like wet sand.
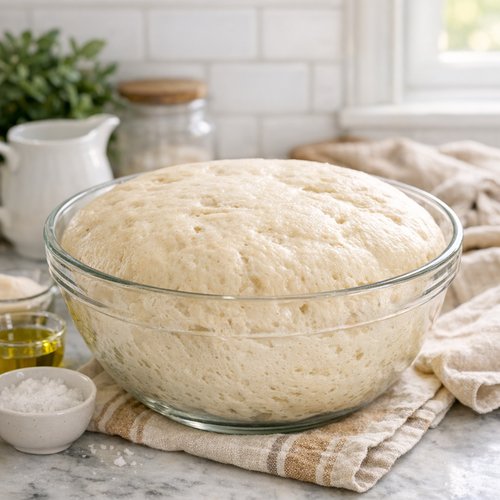
Step 3: Create Your Warm Rising Environment
Cover your bowl with a clean tea towel or plastic wrap and set it aside in a warm spot. Here’s the professional secret: turn your oven on to 350°F for exactly one minute, then turn it off. This creates a gently warmed environment perfect for yeast without overheating it. Do not allow the oven to fully preheat—you’re simply creating a cozy space, not an actual warm setting. In Pittsburgh’s cooler months, I sometimes place the bowl on top of my oven while it cools from this brief preheating. In summer, your kitchen counter works fine.
Now comes the hardest part for impatient kids: waiting. The dough needs at least one hour to rise, though two hours is common in winter or cool kitchens. You’ll know it’s ready when the dough has roughly doubled in size and looks puffy and alive. Set a timer so children understand the passage of time—this is excellent for teaching patience.
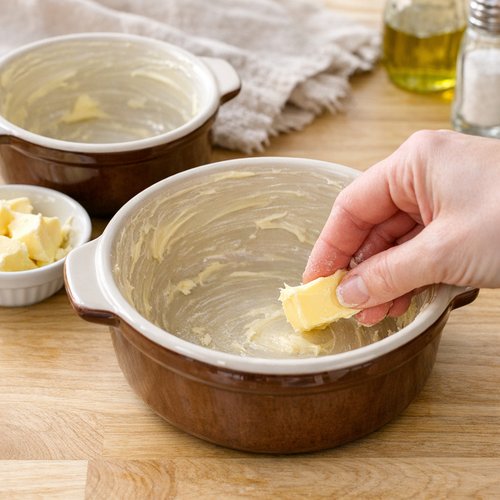
Step 4: Preheat and Prepare Your Bowls
Once your dough has risen, preheat your oven to 425°F. While it heats, take two 1-quart or 1.5-quart oven-safe bowls and generously coat each with about one tablespoon of room temperature butter. Supervise children closely if they’re handling butter—it’s slippery. Make sure every interior surface is coated; this prevents sticking and ensures your finished loaves release cleanly.
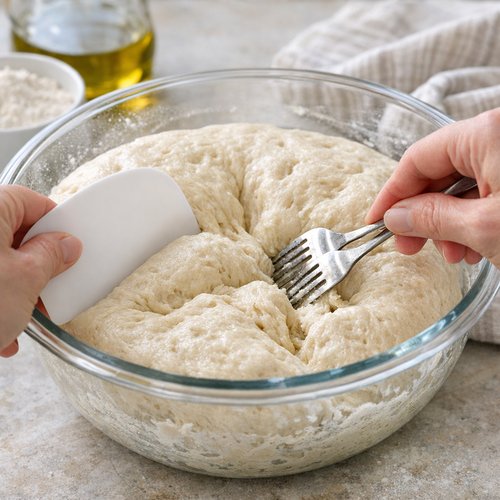
Step 5: Punch Down and Divide
Using two forks, punch down your risen dough. This is where older children truly shine—it’s messy, fun, and feels powerful. Scrape the dough from the sides of the bowl, pulling it toward the center as you work. You want to deflate it completely while loosening it entirely from the bowl. Once it’s punched down, use your two forks to divide it roughly in half. Start from the center and work outward, pulling the dough apart gently. The dough will be very wet and sticky—this is normal and desired.
Using small forks makes this easier than dinner forks; my salad forks work perfectly. Some cooks prefer flexible plastic dough scrapers. Scoop up each half quickly and plop it into your prepared bowls in one confident motion. Speed and confidence matter more than perfection here.
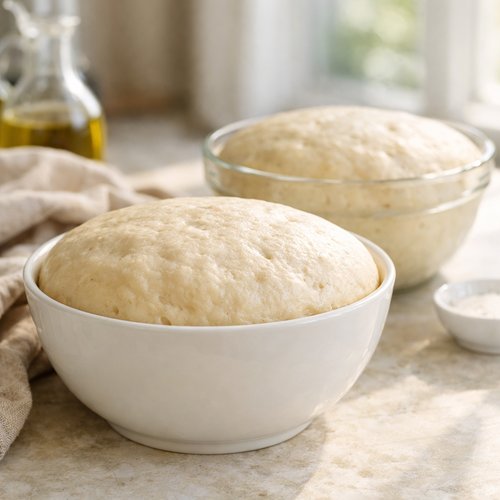
Step 6: Second Rise
Place your bowls on top of your oven (which is now preheating to 425°F) or near another warm spot in your kitchen. The warmth from the oven’s exterior provides perfect conditions for a quick second rise. Leave them uncovered—you want them exposed to that gentle warmth. After 20 to 30 minutes, your dough should rise to just below or slightly above the rim of the bowls, depending on bowl size. Don’t skip this step or rush it—proper rising develops the flavor and texture that makes homemade bread so superior to commercial alternatives.
Step 7: The First Bake
Once your oven reaches 425°F, place both bowls carefully inside. Bake for exactly 15 minutes at this temperature. The high heat creates the crust that makes fresh bread so satisfying to bite into. You’ll watch the magic happen through the oven window: the dough begins to brown, the kitchen fills with that incomparable aroma, and your family gathers around in anticipation.
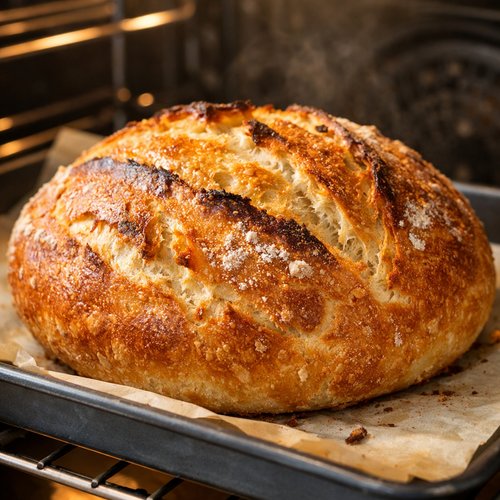
Step 8: The Second Bake
After 15 minutes, reduce your oven temperature to 375°F and continue baking for 15 to 17 minutes longer. This lower temperature ensures the interior bakes through while the exterior develops deep golden color without burning. The total baking time is roughly 30-32 minutes—still incredibly fast compared to traditional bread recipes.
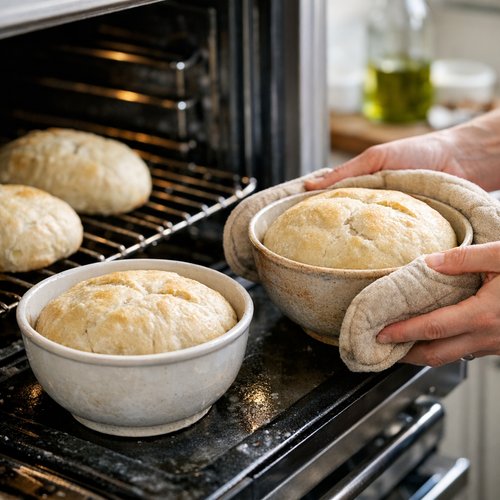
Step 9: Remove and Check
Use oven mitts and ask children to step back from the oven. Remove the bowls carefully and turn the loaves onto cooling racks. If you’ve greased your bowls properly, the loaves should fall out easily. If they resist, return them to the oven (still in their bowls) for another 5 minutes to help them release.
If your loaves look pale and soft, place them directly on the oven rack (without bowls) for an additional 5 minutes to develop more color and crust. This is your quality control moment—perfect brown loaves are your goal.
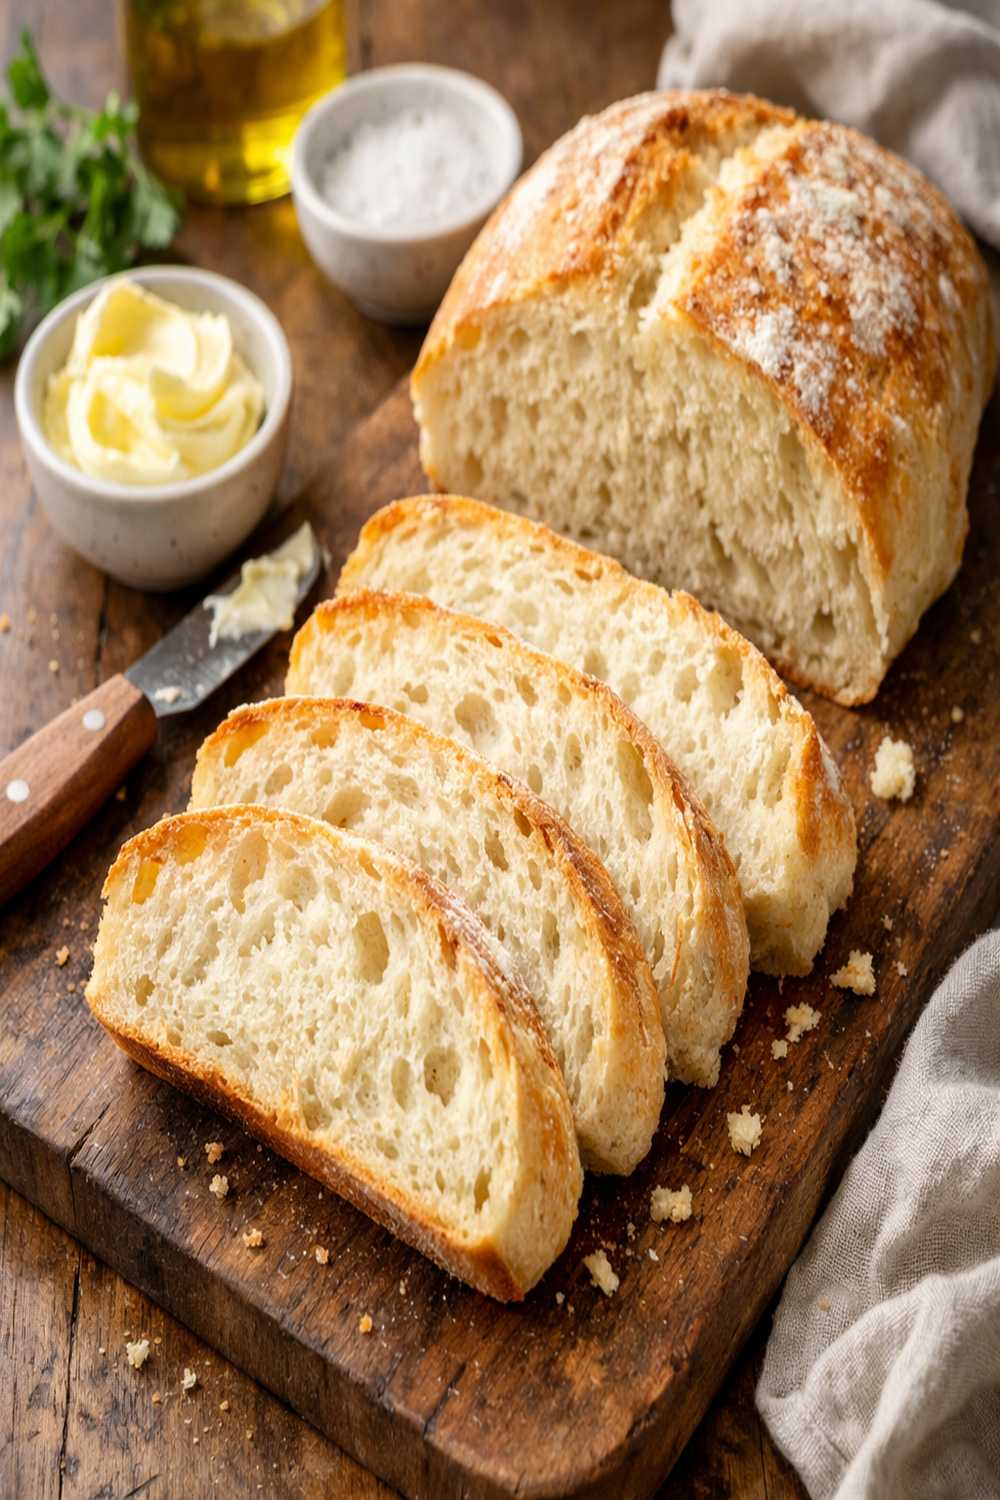
Step 10: Cool and Celebrate
Transfer your finished loaves to cooling racks and wait at least 10 minutes before cutting. I know this is torture, especially for excited children, but this resting period allows the interior structure to set. Cutting too early creates dense, gummy crumb. After 10 minutes, slice into your creation. The steam that rises from a fresh loaf is part of the experience—it’s edible proof of the magic you’ve created together.
Customization Station: Let Everyone Build Their Own
One of the most effective strategies I’ve learned for expanding picky eaters’ palates is giving them control. This bread is versatile enough to become several different things based on individual preference, which means every family member can enjoy a version that speaks to them.
- Topping choices – Offer soft butter, olive oil for dipping, garlic butter (butter mixed with minced garlic and parsley), everything bagel seasoning, coarse sea salt, or even cinnamon-sugar for those who want something sweet. Let each person choose what appeals to them.
- Texture preferences – Some children prefer thicker slices they can grip; others like thinner slices for better crust-to-crumb ratio. Cutting thickness feels like meaningful choice-making to kids.
- Temperature options – Fresh warm bread is wonderful, but some prefer it slightly cooled. Others like a brief return to a warm oven. Offering temperature choice acknowledges that preferences are valid.
- Accompaniments – Serve alongside cheese, hummus, nut butter, olive oil for dipping, or simply plain. The bread is delicious enough to stand alone, but offering companions gives cautious eaters an entry point.
Scaling for Different Family Sizes
The recipe as written makes two loaves, perfect for a family of four to six with lunch and dinner coverage. But families vary, so here’s how to adjust:
For a family of two: Cut all ingredients in half. Use one 1-quart bowl instead of two. Your rise times remain the same, but baking time might reduce by 2-3 minutes since you’re working with a smaller, thinner loaf. You’ll have one beautiful loaf perfect for two days of meals.
For a family of six to eight: Multiply all ingredients by 1.5. Use three bowls and accept that the first rise might take an additional 15-20 minutes since you have more volume. Bake in batches if needed, rotating bowls partway through the second bake to ensure even cooking.
For meal-prep purposes: Make the full double batch. Bake both loaves, cool completely, wrap individually in parchment and then foil, and freeze for up to three weeks. Thaw at room temperature for three hours or warm briefly in a 300°F oven for 10 minutes for that fresh-from-the-oven experience.
Can I Store 20 Minute Bread Recipe?
Fresh bread is best within the first 24 hours, but here’s how to maximize your loaves across several days:
Room temperature storage: Place cooled bread in a paper bag or linen bread bag for up to two days. Paper allows the crust to stay crispy while protecting the interior. Avoid plastic bags unless you prefer a softer crust.
Refrigerator storage: Wrapped tightly in foil, bread lasts up to five days in the refrigerator. The cool temperature slows staling. Slice before refrigerating for convenient grab-and-go breakfast pieces.
Freezer storage: Slice your loaf, wrap individual slices in parchment, place in a freezer bag, and freeze for up to three weeks. Pop slices directly into the toaster for a quick breakfast or snack. This is perfect for busy families—you always have homemade bread available without the time commitment of daily baking.
Lunchbox strategy: Slice bread the night before and pack it in airtight containers. Whole-grain bread stays fresher longer than white bread, and the crust actually protects the interior from drying out during the day. Pair with a smear of butter or your child’s favorite spread for a complete lunch component.
Nutrition Information
Per slice (based on 16 total slices from both loaves): Approximately 100 calories, 2 grams protein, 21 grams carbohydrates, 0.5 grams fat, 1 gram fiber, and 280 milligrams sodium.
From a registered dietitian’s perspective: This bread provides energy through complex carbohydrates—exactly what growing children need for physical activity and brain development. The protein supports muscle growth, and the fiber aids digestion. Unlike many commercial breads loaded with preservatives and added sugars, this recipe contains only whole food ingredients. The fermentation process created by yeast actually increases bioavailability of minerals like iron and zinc, meaning your children’s bodies absorb these nutrients more effectively than from unfermented grain products. According to USDA Dietary Guidelines, children ages 6-8 should consume approximately 5 ounces of grains daily, with at least half being whole grain. Two slices of this bread provides roughly two ounces of grains and can be part of a balanced approach.
Expert’s Nutritional Tip: If you replace half the all-purpose flour with whole wheat flour, you’ll increase fiber content to approximately 2 grams per slice while maintaining the tender crumb that appeals to picky eaters. The flavor shift is subtle—most children won’t notice the difference, but their digestive systems will benefit significantly. This is nutritional stealth that actually works because it doesn’t compromise the eating experience.
What to Serve Alongside for a Complete Family Meal
Fresh bread is rarely a standalone meal, though warm slices with butter come dangerously close. Here are sides that round out the experience and appeal to even cautious eaters:
- Simple green vegetables – Roasted or steamed broccoli, green beans, or asparagus alongside bread becomes a complete meal when paired with cheese or a protein. The bread’s mild flavor doesn’t compete with vegetables, making it easier for kids to accept both components. Consider pairing with Balsamic Asparagus Recipe for a restaurant-quality side that children actually enjoy.
- Creamy pasta dishes – Homemade bread is perfect for soaking up sauce from my weeknight pasta, making this an excellent pairing for family dinners. Children love using bread as a utensil.
- Soup or stew – Crusty bread is the classic companion to warm, comforting soups. This is where bread truly shines—it provides contrast in texture and helps children feel more satisfied.
- Dipping oils and spreads – A small bowl of olive oil with herbs, garlic, or balsamic vinegar makes bread an interactive appetizer. Letting children dip their own pieces increases engagement.
- Cheese board – Fresh bread alongside soft cheese, hard cheese, and simple cured meats creates a meal that looks impressive but requires no cooking. Perfect for busy weeknights when you need something substantial but have no energy left.
Common Mistakes to Avoid
Mistake 1: Water temperature mismanagement – The most common failure point is water that’s either too hot or too cold. If your water temperature exceeds 110°F, you’ll kill the yeast, resulting in dough that never rises. If it’s too cold, fermentation stalls. The simple test: water should feel warm to your wrist, like bathwater. This is why I recommend mixing cold and boiling water separately—it gives you direct control.
Mistake 2: Skipping the second rise – Impatient bakers often go straight from mixing to baking, which results in dense, unpleasant bread. That second 20-30 minute rise is non-negotiable. It develops flavor and creates the tender crumb that makes this recipe special. You’re not adding unnecessary steps; you’re building quality.
Mistake 3: Under-greasing the bowls – Insufficient butter leads to loaves that stick and tear during removal. Err on the side of generous coating. A little extra butter never hurt anyone, and it prevents frustration when your beautiful bread refuses to leave the bowl.
Mistake 4: Cutting before cooling – The interior is still setting during the first 10 minutes after baking. Cutting too early creates a gummy texture that improves dramatically once the loaf has fully cooled. This patience pays off significantly in bread quality.
Seasonal Variations
Spring and Summer: When kitchens are naturally warm, reduce your first rise time by 15-20 minutes. Room temperature often provides adequate warmth without oven assistance. Add fresh herbs like basil, oregano, or thyme to your dry ingredients—roughly 1 teaspoon dried or 1 tablespoon fresh. The brightness of herbs appeals to children during warmer months when appetites shift toward lighter flavors.
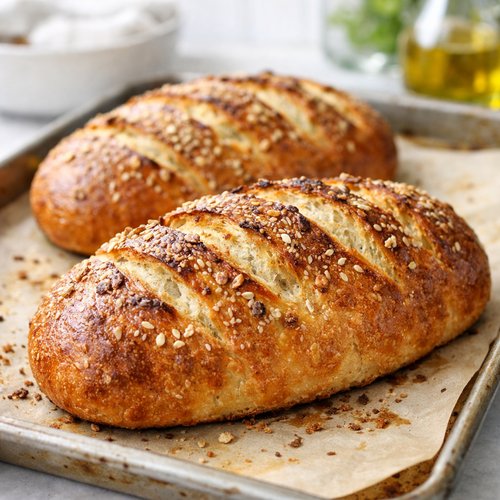
Fall: This is the season of everything bagel seasoning and seeded bread. After the second rise, brush the tops of your loaves with an egg wash (one beaten egg mixed with one tablespoon water), then sprinkle with everything bagel seasoning, sesame seeds, or poppy seeds. The decorative element appeals to kids, and the flavor becomes more complex.
Winter: Cold kitchens demand extended rise times and consistent use of the warm-oven trick. You might also experiment with slight additions like honey (1 extra tablespoon) or a touch of cinnamon (½ teaspoon) for a subtle sweetness that feels seasonal without being obvious.
20 Minute Bread Recipe
Ingredients
Method
- In a large mixing bowl, whisk together your flour, salt, sugar, and instant yeast until well combined. This dry mixture is the foundation of everything that follows. Whisking distributes the yeast evenly, which ensures consistent rising throughout your dough. Assign a school-age child to handle the whisking—they'll need about two minutes of vigorous stirring. The mixture should look fairly uniform, with no visible clumps of yeast or salt.
- Pour your lukewarm water into the dry mixture. The temperature matters here—water that's too hot will kill the yeast, while water that's too cold won't activate it properly. You want it to feel comfortably warm, like bathwater. Stir everything together using a sturdy wooden spoon or your hands until the flour is completely absorbed. Don't worry about smoothness at this stage; you're simply ensuring no dry flour remains. The dough will look shaggy and rough, almost like wet sand.
- Cover your bowl with a clean tea towel or plastic wrap and set it aside in a warm spot. Here's the professional secret: turn your oven on to 350°F for exactly one minute, then turn it off. This creates a gently warmed environment perfect for yeast without overheating it. Do not allow the oven to fully preheat—you're simply creating a cozy space, not an actual warm setting. In Pittsburgh's cooler months, I sometimes place the bowl on top of my oven while it cools from this brief preheating. In summer, your kitchen counter works fine. Now comes the hardest part for impatient kids: waiting. The dough needs at least one hour to rise, though two hours is common in winter or cool kitchens. You'll know it's ready when the dough has roughly doubled in size and looks puffy and alive. Set a timer so children understand the passage of time—this is excellent for teaching patience.
- Once your dough has risen, preheat your oven to 425°F. While it heats, take two 1-quart or 1.5-quart oven-safe bowls and generously coat each with about one tablespoon of room temperature butter. Supervise children closely if they're handling butter—it's slippery. Make sure every interior surface is coated; this prevents sticking and ensures your finished loaves release cleanly.
- Using two forks, punch down your risen dough. This is where older children truly shine—it's messy, fun, and feels powerful. Scrape the dough from the sides of the bowl, pulling it toward the center as you work. You want to deflate it completely while loosening it entirely from the bowl. Once it's punched down, use your two forks to divide it roughly in half. Start from the center and work outward, pulling the dough apart gently. The dough will be very wet and sticky—this is normal and desired. Using small forks makes this easier than dinner forks; my salad forks work perfectly. Some cooks prefer flexible plastic dough scrapers. Scoop up each half quickly and plop it into your prepared bowls in one confident motion. Speed and confidence matter more than perfection here.
- Place your bowls on top of your oven (which is now preheating to 425°F) or near another warm spot in your kitchen. The warmth from the oven's exterior provides perfect conditions for a quick second rise. Leave them uncovered—you want them exposed to that gentle warmth. After 20 to 30 minutes, your dough should rise to just below or slightly above the rim of the bowls, depending on bowl size. Don't skip this step or rush it—proper rising develops the flavor and texture that makes homemade bread so superior to commercial alternatives.
- Once your oven reaches 425°F, place both bowls carefully inside. Bake for exactly 15 minutes at this temperature. The high heat creates the crust that makes fresh bread so satisfying to bite into. You'll watch the magic happen through the oven window: the dough begins to brown, the kitchen fills with that incomparable aroma, and your family gathers around in anticipation.
- After 15 minutes, reduce your oven temperature to 375°F and continue baking for 15 to 17 minutes longer. This lower temperature ensures the interior bakes through while the exterior develops deep golden color without burning. The total baking time is roughly 30-32 minutes—still incredibly fast compared to traditional bread recipes.
- Use oven mitts and ask children to step back from the oven. Remove the bowls carefully and turn the loaves onto cooling racks. If you've greased your bowls properly, the loaves should fall out easily. If they resist, return them to the oven (still in their bowls) for another 5 minutes to help them release. If your loaves look pale and soft, place them directly on the oven rack (without bowls) for an additional 5 minutes to develop more color and crust. This is your quality control moment—perfect brown loaves are your goal.
- Transfer your finished loaves to cooling racks and wait at least 10 minutes before cutting. I know this is torture, especially for excited children, but this resting period allows the interior structure to set. Cutting too early creates dense, gummy crumb. After 10 minutes, slice into your creation. The steam that rises from a fresh loaf is part of the experience—it's edible proof of the magic you've created together.
FAQs
Can I use active dry yeast instead of instant yeast?
Yes, but with adjustment. Active dry yeast is less processed than instant yeast, meaning the particles are larger and activate more slowly. If you’re using active dry yeast, increase the rise times by about 15-20 minutes at each stage. Mix it in with your dry ingredients exactly as written. The end result will be nearly identical; you’re simply allowing for the yeast’s different activation pace.
My dough didn’t rise properly. What went wrong?
The most common culprits are yeast that’s dead (expired or exposed to excessive heat) or water temperature that wasn’t quite right. Check your yeast expiration date—older yeast requires more time or slightly higher quantities. For future batches, use a thermometer to verify water temperature hits the 100-110°F range. If your kitchen is unusually cold, the oven-warming trick becomes essential rather than optional. Give yourself grace—even experienced bakers occasionally get rise timing wrong.
Is this bread recipe naturally vegan-friendly?
Yes, almost entirely. The only non-vegan component is the optional butter for greasing bowls and topping. You can replace it with a neutral oil like vegetable or canola oil without impacting the recipe’s success. Many vegan bakers use this exact method and achieve beautiful results. The bread itself is completely vegan—flour, water, yeast, and salt have no animal products.
Can I make this dough ahead and refrigerate it overnight?
Absolutely, and this is a game-changer for busy families. Mix your dough as written, cover it, and refrigerate for up to 24 hours. The cold slows fermentation dramatically, giving you flexibility in your schedule. When you’re ready to proceed, remove the dough from the refrigerator and let it come to room temperature for about 30 minutes, then follow the remaining steps. Cold fermentation actually develops more complex flavor, so overnight dough sometimes yields superior results.
My loaves came out pale. What happened?
Pale loaves usually indicate insufficient baking time or oven temperature that’s running cool. Ensure your oven is fully preheated before placing loaves inside. If this becomes a recurring issue, invest in an oven thermometer—many home ovens run 10-25°F cooler than their settings suggest. Additionally, pale loaves that still feel soft can be returned to a 350°F oven for another 5-10 minutes to develop color without overcooking. This salvage technique works beautifully.
Make-Ahead Guide
This recipe is exceptionally flexible for meal planning:
Prepare-ahead dough: Mix your dough the night before and refrigerate. This actually enhances flavor through slow fermentation. In the morning, proceed with rise and bake steps. This turns a 40-minute process into a 25-minute process by moving prep work earlier.
Partially-baked loaves: Some bakers bake loaves only 20 minutes total instead of 30, then cool completely, wrap, and freeze. When you want fresh bread, thaw at room temperature and finish baking in a 375°F oven for 10-15 minutes until golden. Your house gets the fresh-baked aroma and taste without the full time commitment.
Freezer slicing strategy: Slice completely cooled bread, freeze individual slices on a sheet pan, then transfer to a freezer bag. Frozen slices toast beautifully or thaw at room temperature in 30 minutes. This eliminates the need to thaw an entire loaf when you only want one or two slices.
More Family-Friendly Recipes
- Authentic Irish Soda Bread Recipe Buttermilk – Another quick-bread option that requires no yeast or rising time, perfect for days when you’re even more pressed for time
- Baked Pasta Cheese Recipe – Pairs beautifully with fresh bread for a complete family meal
- Best Beginner Sourdough Recipe – Once you’ve mastered quick bread, explore the deeper complexity of sourdough fermentation
Making bread alongside your family creates memories that last far longer than the bread itself. I still remember the smell of my grandmother’s kitchen, the warmth of her hands guiding mine through the kneading process, the pride I felt when something I’d helped create nourished the people I loved. You’re not just following a recipe—you’re building traditions, teaching your children that real food comes from real ingredients and real effort, and creating moments of connection in an increasingly hurried world. The fact that this bread is ready in under an hour means you don’t have to choose between quality and convenience. You can have both. Your family deserves nothing less. Happy cooking!