Apple Tart Recipe
This post contains affiliate links. As an Amazon Associate I earn from qualifying purchases.
You know that elegant apple tart from the French patisserie downtown—the one with those perfectly fanned apples glistening under a caramel glaze? The one you’ve been ordering for years because it feels impossibly sophisticated? Here’s the secret: you can make it at home, and honestly, your version will taste better. I’m going to walk you through exactly how to recreate that restaurant magic in your own kitchen, revealing the professional techniques that make it so addictive. This is the same approach I learned during my early years studying nutrition and food science, watching how small details—cold butter, proper lamination, the right apple variety—transform simple ingredients into something truly memorable.
Copycat Apple Tart Recipe That Tastes Better Than the Restaurant Version
My obsession with the perfect apple tart began in my grandmother’s kitchen in Pittsburgh. She didn’t make fancy French pastries—she made humble apple cakes and rustic pies. But years later, when I tasted that delicate, buttery tart with paper-thin apple slices arranged like rose petals, something shifted. I became determined to understand not just the what, but the why. Why does the pastry shatter when you bite it? Why does the filling taste almost caramelized without being overly sweet? Why do the apples maintain their shape instead of collapsing?
What I discovered through testing and research is that restaurant versions rely on precision, technique, and ingredient quality—not complicated methods. And here’s the beautiful part: you can absolutely match (and improve upon) that quality at home.
What Makes the Restaurant Version So Good
The apple tart you’ve been ordering succeeds because of three critical elements working in harmony. First, the pastry is exceptionally tender and flaky, which means it’s made with cold butter and minimal water—creating those delicate layers you hear when you bite through. Second, the apples are selected for a specific balance of tartness and sweetness, then arranged with intention to create visual drama. Third, the filling caramelizes during baking, developing deep flavor without added sugar syrup.
- Laminated pastry technique – The butter is cut into pea-sized pieces and never fully incorporated, creating steam pockets that make the crust shatter, not crunch
- Strategic apple selection – Using a mix of sweet and tart varieties (or specifically Honeycrisp) ensures the filling doesn’t turn to mush while maintaining flavor complexity
- Caramelization through proper oven temperature – The high initial heat (425°F) creates the golden, slightly burnished effect on the apples without burning the pastry underneath
How This Homemade Version Compares
Here’s my honest assessment: your homemade tart will have advantages the restaurant version simply cannot match. The pastry will be fresher—made hours before serving instead of days. You’ll control the exact apple variety and ripeness. You’ll customize the sweetness and seasoning to your preference. The filling will taste like real apples, not a standardized formula.
Where restaurants have a slight edge? Consistency in presentation and the efficiency of their production process. But that’s not actually an advantage in flavor—it’s just visual polish. Your tart, made with intention in your own kitchen, will rival any patisserie version. I’ve had enough of both to make that claim confidently.
The Ingredients – Reverse-Engineered
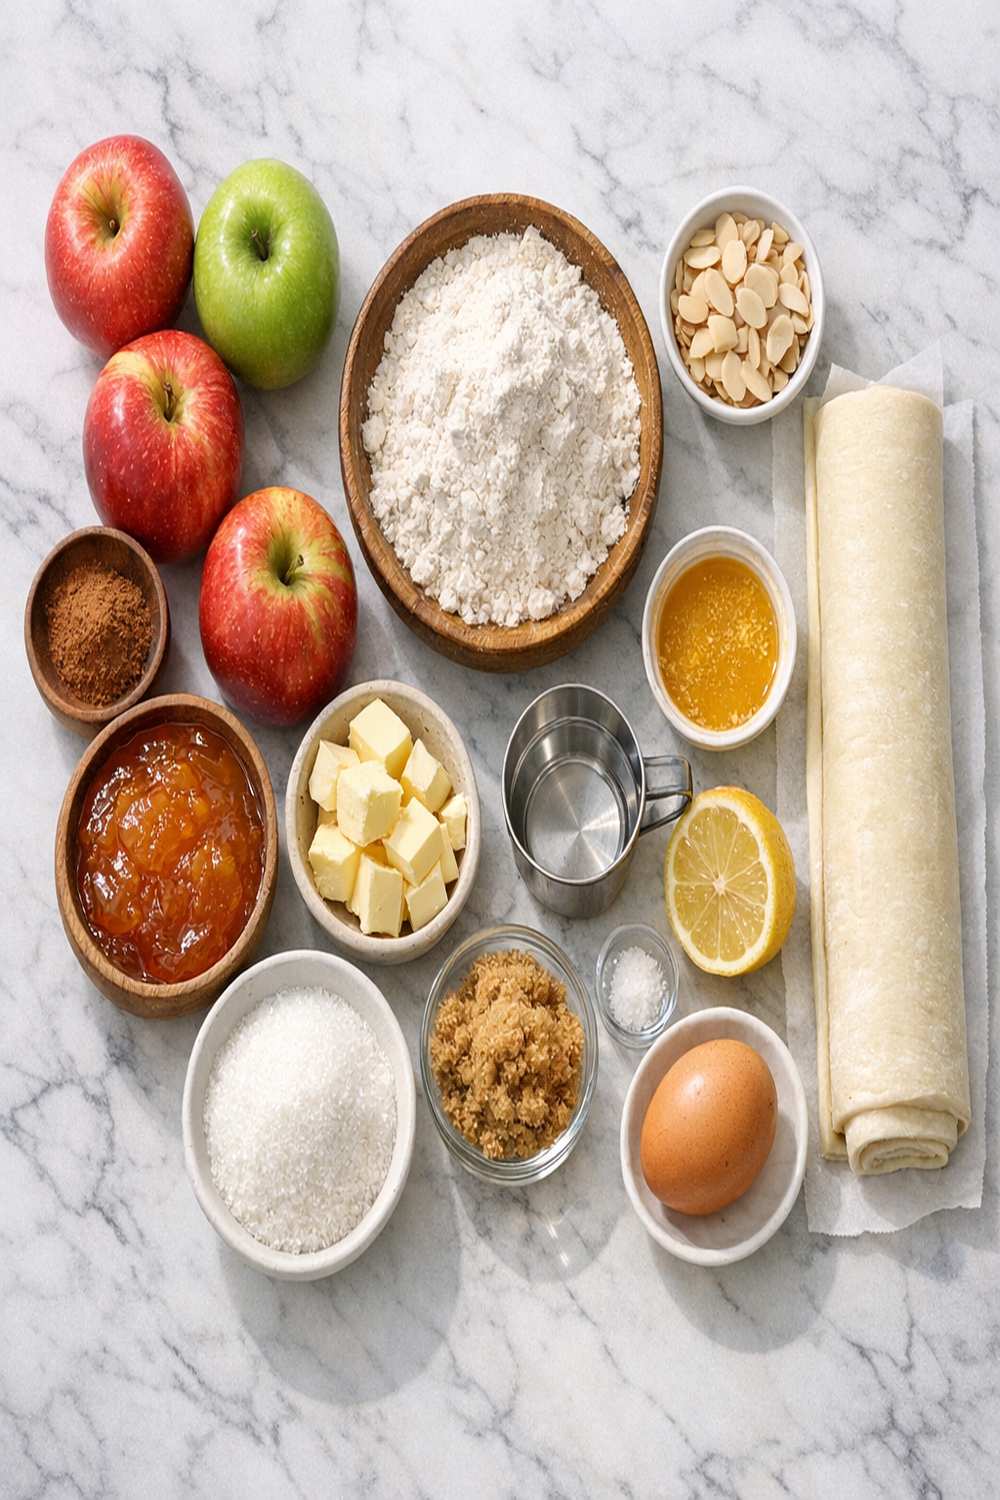
After multiple testing rounds, I’ve identified exactly which ingredients create that restaurant-quality result. The pastry is straightforward—just flour, butter, salt, sugar, and ice water. The magic happens in how these combine and the temperature at which they’re handled. The apple layer is equally simple, which is exactly why ingredient selection matters so much. Every single component serves a purpose.
For the Pastry Crust
- 1 tablespoon granulated sugar (adds subtle sweetness without competing with apples)
- 8 tablespoons cold unsalted butter (cut into cubes, must stay cold throughout handling)
- 1/4 teaspoon kosher salt (enhances butter flavor and pastry structure)
- 5 tablespoons ice water (keep additional ice water nearby in case you need it)
- 1 1/4 cups all-purpose flour (spooned and leveled, never packed—this is crucial for proper structure)
For the Filling and Topping
- Flaky sea salt such as Maldon (adds sophistication and balances sweetness)
- 1/4 cup unsalted butter (creates the caramelized glaze as it melts)
- 1/4 cup granulated sugar (caramelizes during baking for depth)
- 3 to 4 medium Honeycrisp apples (or your preferred baking variety—they hold their shape beautifully)
For the Whipped Cream Accompaniment
- 1 cup heavy whipping cream (full-fat creates the most luxurious texture)
- Pinch of flaky sea salt (cuts through richness and enhances vanilla perception)
- 1/4 cup powdered sugar (creates smoothness when whipped; adjust to taste)
The Copycat Method: How to Recreate Apple Tart Recipe at Home
Now we crack the delicious code. Every step here reveals a professional secret adapted for your home kitchen. Pay attention to temperature and timing—these are where home cooks usually trip up, and where restaurants excel through sheer repetition.
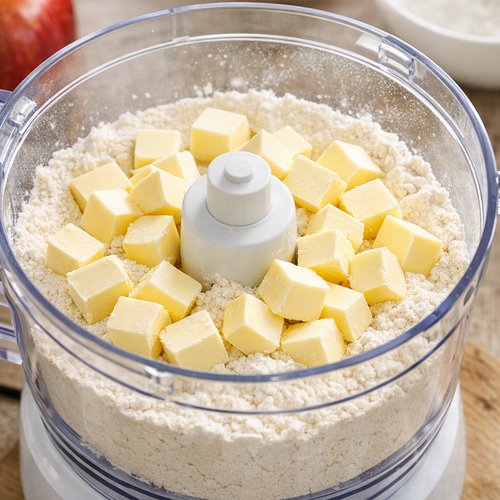
Step 1: Build Your Pastry Foundation with Cold Butter Control
In a food processor, pulse together your flour, sugar, and salt. This dry combination is your blank canvas. Now add those cold, cubed butter pieces. Here’s the restaurant secret I’m sharing: pulse at one-second intervals, about 10 times total, until the butter pieces are roughly the size of small peas. Don’t over-process. You want visible butter specks, not a fine meal. Those specks will steam in the oven and create those beautiful flaky layers.
Add your ice water—start with five tablespoons—and pulse another 10 times until the mixture looks crumbly but holds together when you pinch it between your fingers. The dough should feel slightly moist but not wet. If it’s too dry, add another tablespoon of ice water and pulse again.
Here’s a technique professional pastry chefs use: wrap the dough in a clean kitchen towel, grab the four corners, and twist gently to create a purse shape, pressing the dough into a rough disk as you twist. This method prevents overworking the dough while bringing everything together beautifully.
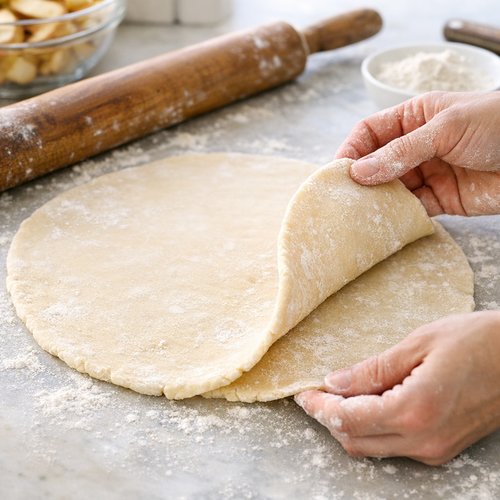
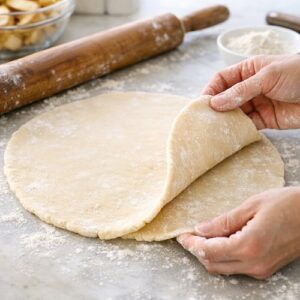
Step 2: Roll and Fit with Professional Precision
On a lightly floured surface, roll your dough into a 12 or 13-inch round. Use this technique that restaurants swear by: flip the dough every few rolls and dust lightly with flour as needed to prevent sticking. This prevents the bottom from becoming compacted while creating an even thickness throughout.
Transfer the rolled dough to your tart pan with removable bottom. Press gently into the corners and up the sides—don’t stretch it, as it will shrink back. Trim any excess pastry around the edges. If you have scraps, save them; you can patch any cracks before baking.
Transfer to your freezer for 30 minutes. This resting period is non-negotiable. It allows the gluten to relax and helps the pastry maintain its shape in the oven instead of slumping.
Step 3: Prepare Your Oven and Position
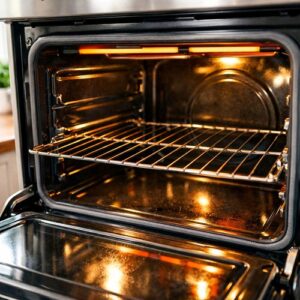
While your pastry rests, preheat your oven to 425°F with the rack positioned in the center. A hot oven is essential for creating that shattered texture in the crust. At this temperature, steam develops quickly, creating those coveted flaky layers before the pastry sets.

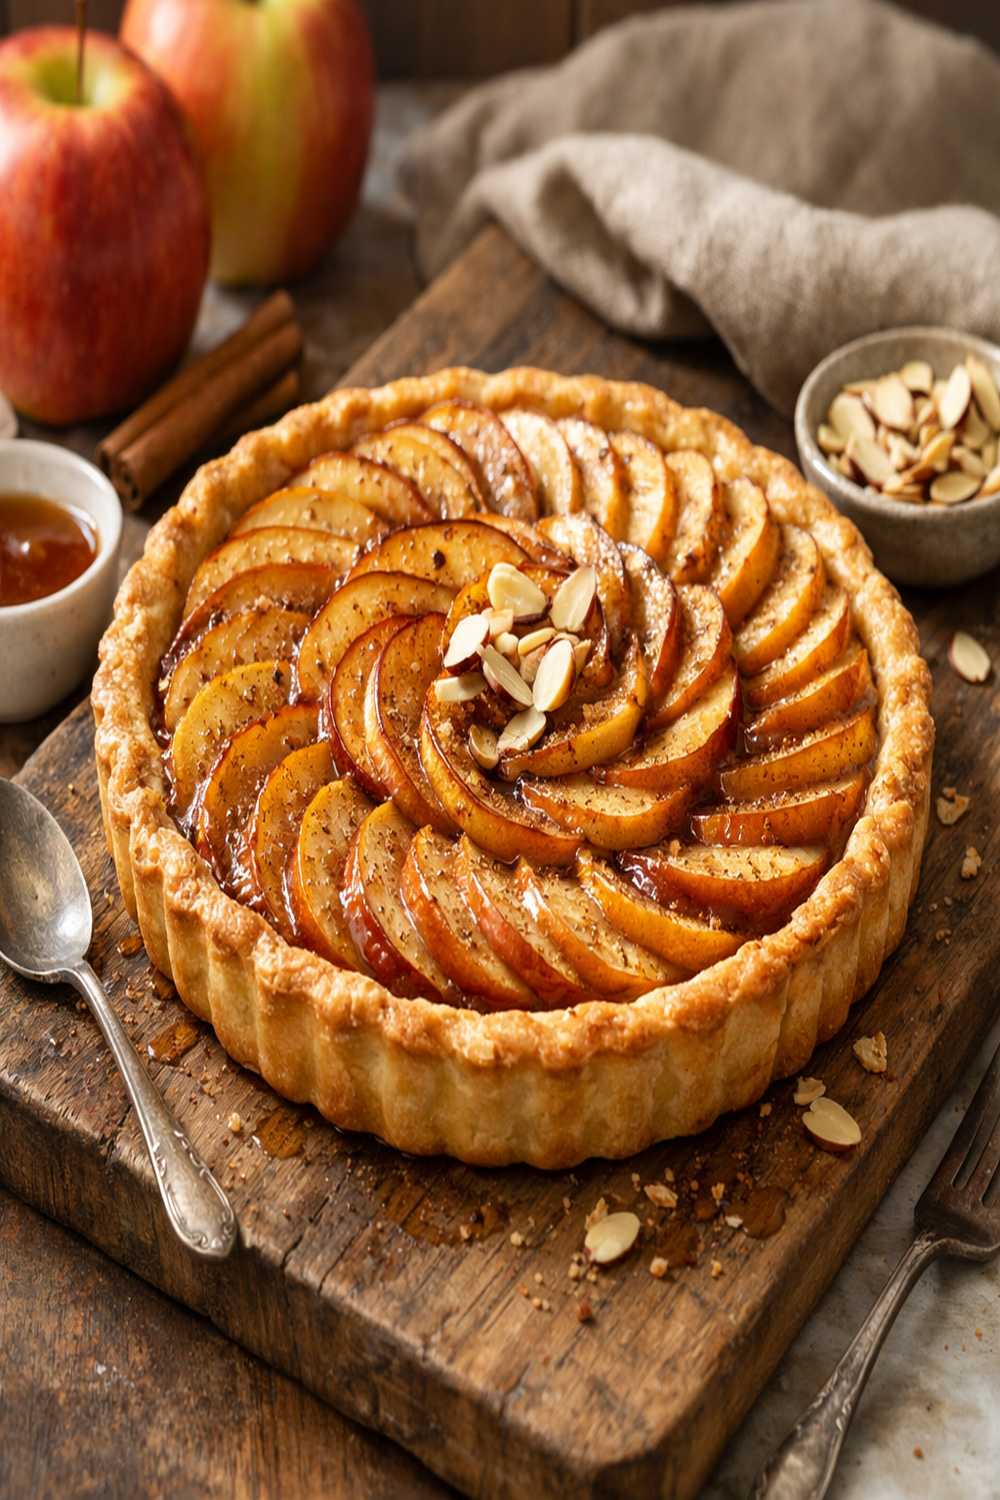
Step 4: Slice Apples for the Perfect Fan Effect
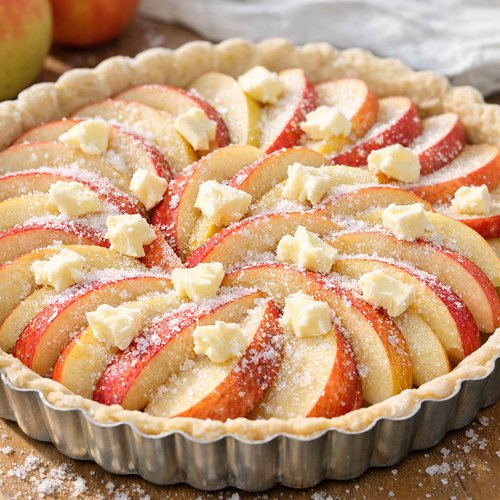
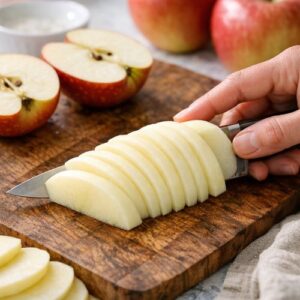
This is where your tart becomes visually stunning. Cut the flat “cheeks” from each apple, making four large pieces—each piece will have one beautiful flat side and the flesh close to it. Discard the core. Lay each cheek flat-side down on your cutting board and slice thinly—about 1/8 inch thick—keeping all the slices together as you work.
When you have four or five apple fans ready, arrange them on your chilled pastry base in whatever pattern appeals to you. Overlap them in concentric circles, create a free-form design, or arrange them in neat rows. The visual composition matters because you’re creating a home version of restaurant-quality presentation.

Step 5: Season and Prepare for Baking
Sprinkle your arranged apples evenly with the 1/4 cup granulated sugar. Tear small pieces from your 1/4 cup cold butter and distribute them across the apples—these will melt and caramelize with the sugar during baking. Place your tart on a rimmed baking sheet (I line mine with parchment paper for easy cleanup, though it’s not essential).
Transfer to your preheated 425°F oven for 35 to 40 minutes. After 15 minutes, check the browning. If the edges or apples are browning too quickly, lower the temperature to 400°F. I find that 425°F works perfectly for most home ovens, but every oven has personality.
For a professional finishing touch, switch your oven to convection bake during the last 2 to 3 minutes. This intensifies caramelization, giving the apples that stunning golden-bronze finish. (This step is entirely optional—the tart tastes wonderful without this extra caramelization step, but it’s worth the extra minute for visual drama.)
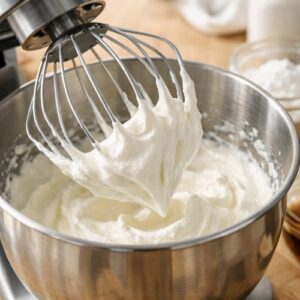
Step 6: Whip the Cream While Tart Cools Slightly
Pour your heavy cream into the bowl of a stand mixer (or use a regular bowl and handheld whisk). Whip on medium speed until soft peaks form—this means the cream holds a gentle peak that falls back slightly when you lift the whisk. This takes about 2 to 3 minutes with a stand mixer, or 5 to 7 minutes by hand.
Add 1/4 cup powdered sugar and beat again until medium peaks form—slightly firmer than soft peaks. Taste, and add more powdered sugar if you prefer it sweeter. Add a generous pinch of flaky sea salt and beat to combine. The salt should be noticeable but not overwhelming; it creates balance and sophistication.

Step 7: Serve with Intention
Remove your tart from the oven when the pastry is golden and the apples are caramelized at the edges. Let it cool for 5 to 10 minutes before serving—this allows the filling to set slightly while the tart remains warm. Serve with generous dollops of your salted whipped cream. This tart is equally delicious served warm or at room temperature, making it perfect for entertaining.
The Secret Sauce: Understanding Caramelization
The magic moment in this tart happens when sugar and butter meet high heat. When you sprinkle sugar on your apples and dot them with butter, you’re setting up a chemical reaction called the Maillard reaction. The heat causes the sugar to break down and the butter to brown slightly, creating hundreds of new flavor compounds that taste nothing like plain sugar or butter alone. This is why the filling seems to have caramel depth without any caramel being added.
The 425°F temperature is specifically chosen for this reason. At lower temperatures, the apples would release their juice and become mushy before proper caramelization could occur. At this higher temperature, the exterior of the apples begins to caramelize while the interior stays tender and juicy. This temperature is also why the pastry needs that 30-minute freeze—it prevents the bottom from burning while the apples cook.
As a registered dietitian, I appreciate that this approach means minimal added sugar while maximum flavor development. The apples’ natural sugars participate in the caramelization, so you get depth without excessive sweetness. The sea salt amplifies this perception of sweetness while actually keeping it restrained.
How to Make It Even Better Than the Original
Here’s where your homemade advantage becomes undeniable. Restaurants make this tart in batches using whatever apples are in season and available. You, making one or two tarts at a time, can be far more intentional.
- Select apples at peak ripeness yourself – Visit a farmers market and taste samples if possible. Look for apples that are fragrant and firm. Honeycrisp, Granny Smith, or a combination of sweet and tart varieties create the most complex flavor profile
- Use real flaky sea salt – Maldon salt is worth the small investment. Its delicate crystals dissolve on your tongue, creating that sophisticated finish restaurants aim for. Regular table salt won’t give the same effect
- Make your whipped cream with full-fat cream – Some restaurants use ultra-pasteurized cream or pre-whipped alternatives. Your homemade version with proper heavy cream will taste dramatically better and hold peaks longer
- Experiment with complementary spices – A tiny pinch of cardamom or a whisper of vanilla extract in the whipped cream creates restaurant-level sophistication without overcomplicating the dish
Cost Comparison: Home vs Restaurant
Let’s talk value. A single apple tart at a quality patisserie costs between $6 and $12 per slice, or $30 to $50 for a whole tart. My homemade version costs approximately $8 to $12 to make the entire tart, serving 6 to 8 people. That’s roughly $1 to $2 per serving—a fraction of the restaurant price.
If you enjoy apple tart once monthly, making this at home saves you $24 to $48 annually per person in your household. For a family of four, that’s nearly $200 in savings. More importantly, you have a tart made with care, exactly when you want it, with ingredients you’ve personally selected. That has value beyond dollars.
Can I Store Apple Tart Recipe?
Yes, with a few guidelines. The fully baked tart keeps best at room temperature for up to 2 days, loosely covered with parchment paper. Don’t use plastic wrap directly on the pastry, as it can make the crust soggy. The pastry will gradually lose its crispness but remains delicious.
You can prepare the pastry shell up to 3 days ahead, keeping it frozen until you’re ready to assemble and bake. Once baked, the tart doesn’t freeze well—the apples become soft and the pastry texture suffers. The unbaked, assembled tart can be frozen for up to 1 week; add 5 to 10 minutes to the baking time if baking from frozen.
Make the whipped cream no more than 2 hours before serving for best texture. Store it covered in the refrigerator. If the peaks begin to weep slightly, simply re-whip for 30 seconds to restore structure.
Nutrition Information
Per serving (1/8 of tart with 2 tablespoons whipped cream): approximately 285 calories, 18g fat, 32g carbohydrates, 3g fiber, 18g sugar, 3g protein, and 180mg sodium. Based on USDA nutritional database standards for all-purpose flour, unsalted butter, and fresh apples.
The nutrition profile here reflects my philosophy as a registered dietitian—this is a celebration food meant to be enjoyed without guilt. The apples provide fiber, vitamin C, and polyphenols (beneficial plant compounds). The butter, while high in fat, provides fat-soluble vitamins and satisfaction. The whipped cream adds richness that makes smaller portions feel indulgent. This is not a health-focused dessert, but rather a food that brings genuine joy when made and shared intentionally. That matters to health too.
What to Order/Make Alongside for the Full Experience
To recreate that complete patisserie experience at home, consider what pairs beautifully with apple tart. Strong coffee or tea is the obvious choice. But if you’re building a dessert course for dinner, think about contrasts and variety. If you’ve already made this warm, rich tart, perhaps offer a lighter vegetable side course beforehand—something like Balsamic Asparagus with a simple vinaigrette creates beautiful balance.
If you’re making this for a brunch or light lunch gathering, pair it with fresh berries, a simple green salad with lemon vinaigrette, and crusty bread. The tart becomes the centerpiece rather than an after-thought dessert.
- French press coffee – The tart’s caramelized sweetness matches the slight bitterness of good coffee beautifully
- Brut Champagne or dry sparkling wine – The acidity cuts through the buttery pastry; the bubbles refresh your palate between bites
- Vanilla or salted caramel ice cream – Serve a small scoop alongside the warm tart for temperature contrast
Expert’s Nutritional Tip: Apple Variety Matters More Than You Think
As someone trained in food science and nutrition, I’ve learned that apple variety affects not just flavor but also the micronutrient profile. Honeycrisp apples are high in polyphenols and maintain their structure beautifully during cooking. Granny Smith apples have more malic acid (tartness) and slightly more fiber per serving. Red Delicious apples are sweeter but softer. For this tart specifically, I recommend Honeycrisp or a mix of Honeycrisp and Granny Smith because they maintain their shape, provide flavor complexity, and offer superior micronutrient density compared to softer varieties.
Make-Ahead Guide: Prep Like a Professional
Three days before serving: Make and freeze your pastry dough. Wrap it tightly in plastic wrap and label with the date. This is my preferred method because the dough develops better flavor after resting.
One day before serving: Thaw the dough in the refrigerator. Prepare your apple selection and store in cool conditions. Make a note of which variety you selected so you remember the combination if you want to repeat it.
Four hours before serving: Remove dough from refrigerator, roll it out, fit it into your tart pan, and freeze for 30 minutes. While it rests, slice your apples. They can sit at room temperature for a few hours; the slight oxidation won’t affect the final tart (though you can toss them lightly with lemon juice if that concerns you).
Two hours before serving: Preheat your oven, assemble the tart with apples and sugar/butter topping, and bake. While it bakes, prepare your cream for whipping. The entire process becomes manageable when broken into these chunks.
Common Mistakes to Avoid
Mistake 1: Using warm or room-temperature butter – The entire success of this pastry depends on cold butter creating steam pockets. If your kitchen is warm, work quickly, and consider chilling your food processor bowl before mixing. I’ve seen home cooks struggle with tough, dense crusts simply because they didn’t keep everything cold enough.
Mistake 2: Overworking the dough – The tendency is to knead and work the dough until it looks perfect. Resist this urge. A rough, slightly shaggy dough will produce better results than a smooth, worked dough. You want to see small butter pieces; if it looks homogeneous, you’ve worked it too much.
Mistake 3: Skipping the freezer rest period – This feels like an unnecessary step when you’re excited to bake. It’s not. The 30-minute freeze allows gluten to relax and prevents your beautifully shaped tart from slumping into a puddle. I know this because I skipped it once early in my kitchen journey, and the disappointment was memorable.
Mistake 4: Selecting apples that are too soft – A mealy apple will disintegrate during cooking, turning into applesauce rather than maintaining its shape. Press your thumb gently into the apple; it should spring back immediately. A dull thud when flicked indicates optimal firmness.
Seasonal Variations: Make This Year-Round
Fall (Peak Apple Season): Use a mix of Honeycrisp, Granny Smith, and Gala apples. Add a tiny pinch of cinnamon to the sugar topping. The classic combination feels most natural when apples are most abundant and affordable.
Winter: Select storage apples like Fuji or Pink Lady, which maintain texture beautifully. Add the tiniest pinch of nutmeg and cloves to the sugar. These warm spices feel appropriate when weather is cold. Serve the tart warm with hot coffee or spiced chai.
Spring/Summer: Use earlier-season apples or make this tart with fresh plums or nectarines instead. The basic pastry and technique work beautifully with other stone fruits. Reduce sugar slightly if using naturally sweeter fruits, and omit the spices to let the fresh fruit flavor shine.
Apple Tart Recipe
Ingredients
Method
- In a food processor, pulse together your flour, sugar, and salt. This dry combination is your blank canvas. Now add those cold, cubed butter pieces. Here's the restaurant secret I'm sharing: pulse at one-second intervals, about 10 times total, until the butter pieces are roughly the size of small peas. Don't over-process. You want visible butter specks, not a fine meal. Those specks will steam in the oven and create those beautiful flaky layers. Add your ice water—start with five tablespoons—and pulse another 10 times until the mixture looks crumbly but holds together when you pinch it between your fingers. The dough should feel slightly moist but not wet. If it's too dry, add another tablespoon of ice water and pulse again. Here's a technique professional pastry chefs use: wrap the dough in a clean kitchen towel, grab the four corners, and twist gently to create a purse shape, pressing the dough into a rough disk as you twist. This method prevents overworking the dough while bringing everything together beautifully.

- On a lightly floured surface, roll your dough into a 12 or 13-inch round. Use this technique that restaurants swear by: flip the dough every few rolls and dust lightly with flour as needed to prevent sticking. This prevents the bottom from becoming compacted while creating an even thickness throughout. Transfer the rolled dough to your tart pan with removable bottom. Press gently into the corners and up the sides—don't stretch it, as it will shrink back. Trim any excess pastry around the edges. If you have scraps, save them; you can patch any cracks before baking. Transfer to your freezer for 30 minutes. This resting period is non-negotiable. It allows the gluten to relax and helps the pastry maintain its shape in the oven instead of slumping.
- While your pastry rests, preheat your oven to 425°F with the rack positioned in the center. A hot oven is essential for creating that shattered texture in the crust. At this temperature, steam develops quickly, creating those coveted flaky layers before the pastry sets.
- This is where your tart becomes visually stunning. Cut the flat "cheeks" from each apple, making four large pieces—each piece will have one beautiful flat side and the flesh close to it. Discard the core. Lay each cheek flat-side down on your cutting board and slice thinly—about 1/8 inch thick—keeping all the slices together as you work. When you have four or five apple fans ready, arrange them on your chilled pastry base in whatever pattern appeals to you. Overlap them in concentric circles, create a free-form design, or arrange them in neat rows. The visual composition matters because you're creating a home version of restaurant-quality presentation.
- Sprinkle your arranged apples evenly with the 1/4 cup granulated sugar. Tear small pieces from your 1/4 cup cold butter and distribute them across the apples—these will melt and caramelize with the sugar during baking. Place your tart on a rimmed baking sheet (I line mine with parchment paper for easy cleanup, though it's not essential). Transfer to your preheated 425°F oven for 35 to 40 minutes. After 15 minutes, check the browning. If the edges or apples are browning too quickly, lower the temperature to 400°F. I find that 425°F works perfectly for most home ovens, but every oven has personality. For a professional finishing touch, switch your oven to convection bake during the last 2 to 3 minutes. This intensifies caramelization, giving the apples that stunning golden-bronze finish. (This step is entirely optional—the tart tastes wonderful without this extra caramelization step, but it's worth the extra minute for visual drama.)

- Pour your heavy cream into the bowl of a stand mixer (or use a regular bowl and handheld whisk). Whip on medium speed until soft peaks form—this means the cream holds a gentle peak that falls back slightly when you lift the whisk. This takes about 2 to 3 minutes with a stand mixer, or 5 to 7 minutes by hand. Add 1/4 cup powdered sugar and beat again until medium peaks form—slightly firmer than soft peaks. Taste, and add more powdered sugar if you prefer it sweeter. Add a generous pinch of flaky sea salt and beat to combine. The salt should be noticeable but not overwhelming; it creates balance and sophistication.
- Remove your tart from the oven when the pastry is golden and the apples are caramelized at the edges. Let it cool for 5 to 10 minutes before serving—this allows the filling to set slightly while the tart remains warm. Serve with generous dollops of your salted whipped cream. This tart is equally delicious served warm or at room temperature, making it perfect for entertaining.
FAQs
Can I make the pastry by hand instead of using a food processor?
Absolutely, and some pastry chefs prefer this method because you have more control. In a large bowl, combine your flour, sugar, and salt. Cut the cold butter into small cubes and add it to the dry ingredients. Using two knives or a pastry cutter, cut the butter into the flour until the mixture resembles breadcrumbs with some pea-sized pieces remaining. This takes about 5 to 7 minutes of work. Add your ice water gradually, stirring with a fork until the dough just comes together. The key is keeping everything cold and working quickly so the butter doesn’t warm and blend completely into the flour.
What if I don’t have a tart pan with a removable bottom?
A regular 9-inch pie pan works beautifully. The pastry will cook slightly faster around the edges, so check it after 30 minutes rather than waiting the full 35 to 40. You can also use a rimmed baking sheet and free-form the pastry into a rustic rectangular or circular shape. The final product will be equally delicious even if presentation is less formal.
Can I use store-bought puff pastry or pie dough instead?
Yes, and this is a perfectly valid shortcut. Quality store-bought puff pastry will give you excellent results, though it won’t be exactly the same as homemade. The advantage is time saved; the disadvantage is slightly less control over ingredients and texture. Use it according to package directions, and reduce your baking time by about 5 minutes since commercial puff pastry is already partially cooked.
How do I know when the tart is finished baking?
The pastry should be golden brown throughout, not just around the edges. The apples should appear translucent around the edges and caramelized on top. If you see a little juice bubbling up around the apples, that’s perfect—it means they’re releasing their natural juices and concentrating flavor. The whole tart should smell strongly of caramelized apples and butter, not raw flour.
Can I make individual tarts instead of one large tart?
Yes! This recipe scales beautifully to 4-inch tartlet pans. Use the same pastry dough but divide it among individual pans. You’ll need fewer apple slices per tart, so this makes more servings from the same amount of fruit. Bake for 20 to 25 minutes at 425°F. Individual tarts are beautiful for entertaining and easier to serve without cutting.
More Restaurant Copycat Recipes
- this simple cake – Recreate this beloved classic dessert with rich, moist layers
- Authentic Irish Soda Bread Recipe Buttermilk – Master the rustic bread from your favorite Irish restaurant
After testing this recipe multiple times and comparing it side-by-side with my favorite patisserie version, I can tell you with certainty: cracking the code of a beloved restaurant dish is one of cooking’s greatest satisfactions. That moment when you pull your golden apple tart from the oven and the kitchen fills with that aroma—buttered apples, caramelized sugar, toasted pastry—is when you realize you’ve just become a home baker of real skill.
The beauty of this recipe is that it’s accessible without being simplistic. It requires attention and care, but not special equipment or obscure ingredients. Every element serves the final dish. And when you serve it to someone and they taste the crispy-yet-tender pastry, the perfectly sweet-tart apples, the creamy whipped cream with that subtle salt finish—when you see their face light up—you’ll understand why I’ve spent so much time perfecting this one beautiful dessert.
Happy cooking!